Creare e distribuire un'App DeFi


In questo tutorial creeremo un'applicazione DeFi con Solidity in cui gli utenti possono depositare un token ERC20 sullo smart contract, per poter coniare e trasferire i token Farm. Gli utenti possono quindi prelevare i token ERC20: una volta bruciato il token Farm sullo smart contract, i token ERC20 verranno ritrasferiti.
Installa Truffle e Ganache
Se questa è la prima volta che scrivi uno smart contract, dovrai configurare il tuo ambiente. Useremo due strumenti: Truffle(opens in a new tab) e Ganache(opens in a new tab).
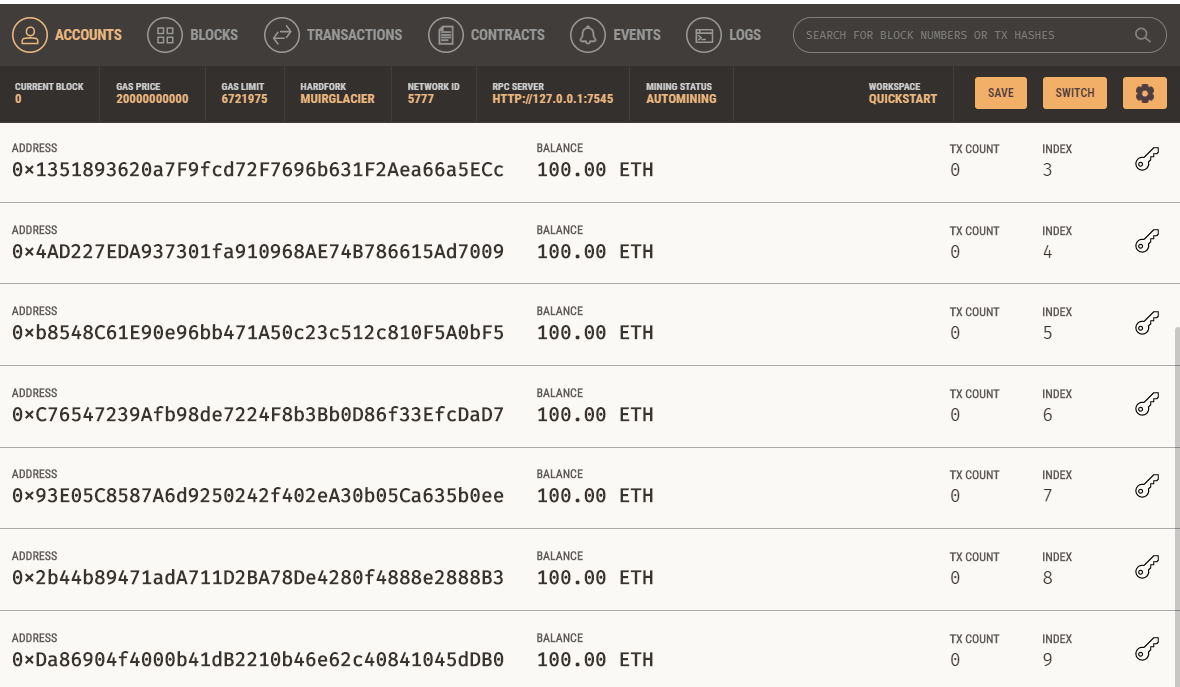
Truffle è un ambiente di sviluppo e framework di verifica per lo sviluppo di smart contract per Ethereum. Con Truffle è facile costruire e distribuire gli smart contract alla blockchain. Ganache consente di creare una blockchain locale di Ethereum per poter testare gli smart contract. Simula le funzionalità della rete reale e, i primi 10 conti, sono finanziati con 100 ether di prova, rendendo la distribuzione e i test del contratto intelligente, gratuiti e facili. Ganache è disponibile come applicazione desktop e strumento di riga di comando. Per questo articolo useremo l'applicazione desktop dell'UI.
 (opens in a new tab)Applicazione desktop dell'UI di Ganache
Per creare il progetto, esegui i seguenti comandi
mkdir your-project-namecd your-project-nametruffle init
Verrà creato un progetto vuoto per lo sviluppo e la distribuzione dei nostri smart contract. La struttura del progetto creato è la seguente:
contracts: Cartella per gli smart contract in Soliditymigrations: Cartella per gli script di distribuzionetest: Cartella per collaudare i nostri smart contracttruffle-config.js: File di configurazione di Truffle
Crea il Token ERC20
Innanzi tutto dobbiamo creare il nostro token ERC20, che useremo per lo staking sullo smart contract. Per creare il nostro token fungibile, dovremo prima installare la libreria di OpenZeppelin. Essa contiene le implementazioni di standard come ERC20 ed ERC721. Per installare, esegui il comando:
npm install @openzeppelin/contracts
Usando la libreria di OpenZeppelin possiamo creare il nostro token ERC20 scrivendo in contracts/MyToken.sol con il seguente codice in Solidity:
1pragma solidity ^0.8.0;23import "@openzeppelin/contracts/token/ERC20/ERC20.sol";45contract MyToken is ERC20 {6 constructor() public ERC20("MyToken", "MTKN"){7 _mint(msg.sender, 1000000000000000000000000);8 }9}Mostra tuttoCopia
Nel codice seguente alla:
Riga 3: Importiamo l'ERC20.sol del contratto da openzeppelin, che contiene l'implementazione per questo standard del token.
Riga 5: Ereditiamo dal contratto ERC20.sol.
Riga 6: Chiamiamo il costruttore di ERC20.sol e passiamo per il nome e i parametri del simbolo come
"MyToken"e"MTKN"rispettivamente.Riga 7: Coniamo e trasferiamo 1 milione di token per il conto che sta distribuendo il contratto intelligente (usiamo i 18 decimali predefiniti per il token ERC20, il che significa che se vogliamo coniare 1 token, lo rappresenterai come 1000000000000000000, 1 con 18 zeri).
Possiamo vedere di seguito l'implementazione del costruttore di ERC20.sol, dove il campo _decimals è impostato a 18:
1string private _name;2string private _symbol;3uint8 private _decimals;45constructor (string memory name_, string memory symbol_) public {6 _name = name_;7 _symbol = symbol_;8 _decimals = 18;9}Mostra tutto
Compila il Token ERC20
Per compilare il nostro smart contract, dobbiamo prima verificare la nostra versione del compilatore in Solidity. Puoi verificarla eseguendo il comando:
truffle version
La versione predefinita è Solidity v0.5.16. Poiché il nostro token è scritto usando la versione 0.6.2 di Solidity, se eseguiamo il comando per compilare i nostri contratti otterremo un errore del compilatore. Per poter specificare quale versione del compilatore di Solidity usare, vai al file truffle-config.js e imposta sulla versione del compilatore desiderata, come mostrato di seguito:
1// Configure your compilers2compilers: {3 solc: {4 version: "^0.8.0", // Fetch exact version from solc-bin (default: truffle's version)5 // docker: true, // Use "0.5.1" you've installed locally with docker (default: false)6 // settings: { // See the solidity docs for advice about optimization and evmVersion7 // optimizer: {8 // enabled: false,9 // runs: 20010 // },11 // evmVersion: "byzantium"12 // }13 }14}Mostra tutto
Ora possiamo compilare il nostro smart contract eseguendo il seguente comando:
truffle compile
Distribuisci il Token ERC20
Dopo la compilazione, possiamo distribuire il nostro token.
Sulla cartella migrations, crea un file denominato 2_deploy_Tokens.js. Questo file è dove distribuiremo sia il nostro Token ERC20 che il nostro contratto intelligente di FarmToken. Il codice seguente è usato per distribuire il nostro contratto MyToken.sol:
1const MyToken = artifacts.require("MyToken")23module.exports = async function (deployer, network, accounts) {4 // Deploy MyToken5 await deployer.deploy(MyToken)6 const myToken = await MyToken.deployed()7}
Apri Ganache e seleziona l'opzione "Avvio Rapido" per avviare una blockchain locale di Ethereum. Per distribuire il nostro contratto, esegui:
truffle migrate
L'indirizzo usato per distribuire i nostri contratti è il primo dall'elenco di indirizzi che Ganache ci mostra. Per verificarlo, possiamo aprire l'applicazione desktop di Ganache e possiamo verificare che il saldo di ether per il primo conto sia stato ridotto a causa del costo di ether per distribuire i nostri contratti intelligenti:
 (opens in a new tab)Applicazione desktop di Ganache
Per verificare che 1 milione di token MyToken sia stato inviato all'indirizzo del distributore, possiamo usare la Console di Truffle per interagire con il nostro smart contract distribuito.
Per poter interagire con il nostro smart contract, esegui il seguente comando:
truffle console
Ora possiamo scrivere i seguenti comandi nel terminale:
Ottieni lo smart contract:
myToken = await MyToken.deployed()Ottieni l'insieme di conti da Ganache:
accounts = await web3.eth.getAccounts()Ottieni il saldo del primo conto:
balance = await myToken.balanceOf(accounts[0])Formatta il saldo da 18 decimali:
web3.utils.fromWei(balance.toString())
Eseguendo i suddetti comandi, vedremo che il primo indirizzo ha difatti 1 milione di MyToken:

Il primo indirizzo ha 1000000 MyToken
Crea lo smart contract del FarmToken
Lo smart contract FarmToken avrà 3 funzioni:
balance(): Ottieni il saldo di MyToken sullo smart contract di FarmToken.deposit(uint256 _amount): Trasferisci MyToken per conto dell'utente dello smart contract di FarmToken, quindi conia e trasferisci il FarmToken all'utente.withdraw(uint256 _amount): Brucia i FarmToken dell'utente e trasferisci i MyToken all'indirizzo dell'utente.
Diamo un'occhiata al costruttore del FarmToken:
1pragma solidity ^0.6.2;23import "@openzeppelin/contracts/token/ERC20/IERC20.sol";4import "@openzeppelin/contracts/utils/Address.sol";5import "@openzeppelin/contracts/token/ERC20/utils/SafeERC20.sol";6import "@openzeppelin/contracts/token/ERC20/ERC20.sol";78contract FarmToken is ERC20 {9 using Address for address;10 using SafeMath for uint256; // As of Solidity v0.8.0, mathematical operations can be done safely without the need for SafeMath11 using SafeERC20 for IERC20;1213 IERC20 public token;1415 constructor(address _token)16 public17 ERC20("FarmToken", "FRM")18 {19 token = IERC20(_token);20 }Mostra tutto
Righe 3-6: Importiamo i seguenti contratti da OpenZeppelin: IERC20.sol, Address.sol, SafeERC20.sol ed ERC20.sol.
Riga 8: Il FarmToken erediterà dal contratto ERC20.
Righe 14-19: Il costruttore del FarmToken riceverà come parametro l'indirizzo del contratto MyToken e ne assegneremo il contratto alla nostra variabile pubblica, chiamata
token.
Implementiamo la funzione balance(). Non riceverà alcun parametro e restituirà il saldo di MyToken su questo smart contract. È implementato come mostrato sotto:
1function balance() public view returns (uint256) {2 return token.balanceOf(address(this));3}
Per la funzione deposit(uint256 _amount), riceverà come parametro la quantità che l'utente desidera depositare e conierà e trasferirà i FarmToken all'utente:
1function deposit(uint256 _amount) public {2 // Amount must be greater than zero3 require(_amount > 0, "amount cannot be 0");45 // Transfer MyToken to smart contract6 token.safeTransferFrom(msg.sender, address(this), _amount);78 // Mint FarmToken to msg sender9 _mint(msg.sender, _amount);10}Mostra tutto
Per la funzione withdraw(uint256 _amount), riceveremo come parametro l'importo di FarmToken che l'utente vuole bruciare e poi trasferiremo lo stesso importo di MyToken all'utente:
1function withdraw(uint256 _amount) public {2 // Burn FarmTokens from msg sender3 _burn(msg.sender, _amount);45 // Transfer MyTokens from this smart contract to msg sender6 token.safeTransfer(msg.sender, _amount);7}
Ora distribuiremo il nostro smart contract. Per farlo, torneremo al file 2_deploy_Tokens.js e aggiungeremo il nuovo contratto da distribuire:
1const MyToken = artifacts.require("MyToken")2const FarmToken = artifacts.require("FarmToken")34module.exports = async function (deployer, network, accounts) {5 // Deploy MyToken6 await deployer.deploy(MyToken)7 const myToken = await MyToken.deployed()89 // Deploy Farm Token10 await deployer.deploy(FarmToken, myToken.address)11 const farmToken = await FarmToken.deployed()12}Mostra tutto
Nota che distribuendo il FarmToken, passiamo come parametro l'indirizzo del contratto MyToken distribuito.
Ora, esegui truffle compile e truffle migrate per distribuire i nostri contratti.
Testiamo il nostro smart contract. Anziché usare la truffle console per interagire con il nostro smart contract, creeremo uno script per automatizzare questo processo. Crea una cartella denominata scripts e aggiungi il seguente file getMyTokenBalance.js. Verificherà il saldo di MyToken sullo smart contract del FarmToken:
1const MyToken = artifacts.require("MyToken")2const FarmToken = artifacts.require("FarmToken")34module.exports = async function (callback) {5 myToken = await MyToken.deployed()6 farmToken = await FarmToken.deployed()7 balance = await myToken.balanceOf(farmToken.address)8 console.log(web3.utils.fromWei(balance.toString()))9 callback()10}Mostra tutto
Per eseguire questo script, esegui il seguente comando CLI:
truffle exec .\scripts\getMyTokenBalance.js
Otterremo il risultato previsto, pari a 0. Se ottieni un errore secondo cui FarmToken non è stato ancora distribuito, la rete di Truffle non ha ricevuto l'ultima versione del codice del contratto. Basta chiudere Ganache, riavviarlo rapidamente e assicurarsi di eseguire truffle migrate.
Ora, mettiamo in gioco il MyToken sullo smart contract Poiché la funzione deposit(uint256_amount) chiama la funzione safeTransferFrom dall'ERC20, l'utente deve prima approvare lo smart contract per trasferire i MyToken per conto dell'utente. Quindi sullo script seguente, approveremo prima questa fase, poi chiameremo la funzione:
1const MyToken = artifacts.require("MyToken")2const FarmToken = artifacts.require("FarmToken")34module.exports = async function (callback) {5 const accounts = await new web3.eth.getAccounts()6 const myToken = await MyToken.deployed()7 const farmToken = await FarmToken.deployed()89 // Returns the remaining number of tokens that spender will be allowed to spend on behalf of owner through transferFrom.10 // This is zero by default.11 const allowanceBefore = await myToken.allowance(12 accounts[0],13 farmToken.address14 )15 console.log(16 "Amount of MyToken FarmToken is allowed to transfer on our behalf Before: " +17 allowanceBefore.toString()18 )1920 // In order to allow the Smart Contract to transfer to MyToken (ERC-20) on the accounts[0] behalf,21 // we must explicitly allow it.22 // We allow farmToken to transfer x amount of MyToken on our behalf23 await myToken.approve(farmToken.address, web3.utils.toWei("100", "ether"))2425 // Validate that the farmToken can now move x amount of MyToken on our behalf26 const allowanceAfter = await myToken.allowance(accounts[0], farmToken.address)27 console.log(28 "Amount of MyToken FarmToken is allowed to transfer on our behalf After: " +29 allowanceAfter.toString()30 )3132 // Verify accounts[0] and farmToken balance of MyToken before and after the transfer33 balanceMyTokenBeforeAccounts0 = await myToken.balanceOf(accounts[0])34 balanceMyTokenBeforeFarmToken = await myToken.balanceOf(farmToken.address)35 console.log("*** My Token ***")36 console.log(37 "Balance MyToken Before accounts[0] " +38 web3.utils.fromWei(balanceMyTokenBeforeAccounts0.toString())39 )40 console.log(41 "Balance MyToken Before TokenFarm " +42 web3.utils.fromWei(balanceMyTokenBeforeFarmToken.toString())43 )4445 console.log("*** Farm Token ***")46 balanceFarmTokenBeforeAccounts0 = await farmToken.balanceOf(accounts[0])47 balanceFarmTokenBeforeFarmToken = await farmToken.balanceOf(farmToken.address)48 console.log(49 "Balance FarmToken Before accounts[0] " +50 web3.utils.fromWei(balanceFarmTokenBeforeAccounts0.toString())51 )52 console.log(53 "Balance FarmToken Before TokenFarm " +54 web3.utils.fromWei(balanceFarmTokenBeforeFarmToken.toString())55 )56 // Call Deposit function from FarmToken57 console.log("Call Deposit Function")58 await farmToken.deposit(web3.utils.toWei("100", "ether"))59 console.log("*** My Token ***")60 balanceMyTokenAfterAccounts0 = await myToken.balanceOf(accounts[0])61 balanceMyTokenAfterFarmToken = await myToken.balanceOf(farmToken.address)62 console.log(63 "Balance MyToken After accounts[0] " +64 web3.utils.fromWei(balanceMyTokenAfterAccounts0.toString())65 )66 console.log(67 "Balance MyToken After TokenFarm " +68 web3.utils.fromWei(balanceMyTokenAfterFarmToken.toString())69 )7071 console.log("*** Farm Token ***")72 balanceFarmTokenAfterAccounts0 = await farmToken.balanceOf(accounts[0])73 balanceFarmTokenAfterFarmToken = await farmToken.balanceOf(farmToken.address)74 console.log(75 "Balance FarmToken After accounts[0] " +76 web3.utils.fromWei(balanceFarmTokenAfterAccounts0.toString())77 )78 console.log(79 "Balance FarmToken After TokenFarm " +80 web3.utils.fromWei(balanceFarmTokenAfterFarmToken.toString())81 )8283 // End function84 callback()85}Mostra tutto
Per eseguire questo script: truffle exec .\scripts\transferMyTokenToFarmToken.js. Dovresti vedere sulla tua console:
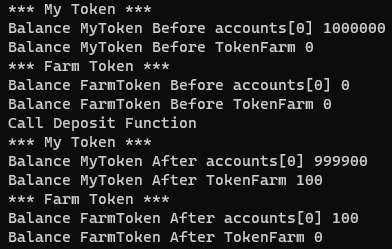
output di transferMyTokenToFarmToken.js
Come possiamo vedere, abbiamo depositato correttamente i MyToken al contratto intelligente, poiché il primo conto ha ora dei FarmToken.
Per poter prelevare:
1const MyToken = artifacts.require("MyToken")2const FarmToken = artifacts.require("FarmToken")34module.exports = async function (callback) {5 const accounts = await new web3.eth.getAccounts()6 const myToken = await MyToken.deployed()7 const farmToken = await FarmToken.deployed()89 // Verify accounts[0] and farmToken balance of MyToken before and after the transfer10 balanceMyTokenBeforeAccounts0 = await myToken.balanceOf(accounts[0])11 balanceMyTokenBeforeFarmToken = await myToken.balanceOf(farmToken.address)12 console.log("*** My Token ***")13 console.log(14 "Balance MyToken Before accounts[0] " +15 web3.utils.fromWei(balanceMyTokenBeforeAccounts0.toString())16 )17 console.log(18 "Balance MyToken Before TokenFarm " +19 web3.utils.fromWei(balanceMyTokenBeforeFarmToken.toString())20 )2122 console.log("*** Farm Token ***")23 balanceFarmTokenBeforeAccounts0 = await farmToken.balanceOf(accounts[0])24 balanceFarmTokenBeforeFarmToken = await farmToken.balanceOf(farmToken.address)25 console.log(26 "Balance FarmToken Before accounts[0] " +27 web3.utils.fromWei(balanceFarmTokenBeforeAccounts0.toString())28 )29 console.log(30 "Balance FarmToken Before TokenFarm " +31 web3.utils.fromWei(balanceFarmTokenBeforeFarmToken.toString())32 )3334 // Call Deposit function from FarmToken35 console.log("Call Withdraw Function")36 await farmToken.withdraw(web3.utils.toWei("100", "ether"))3738 console.log("*** My Token ***")39 balanceMyTokenAfterAccounts0 = await myToken.balanceOf(accounts[0])40 balanceMyTokenAfterFarmToken = await myToken.balanceOf(farmToken.address)41 console.log(42 "Balance MyToken After accounts[0] " +43 web3.utils.fromWei(balanceMyTokenAfterAccounts0.toString())44 )45 console.log(46 "Balance MyToken After TokenFarm " +47 web3.utils.fromWei(balanceMyTokenAfterFarmToken.toString())48 )4950 console.log("*** Farm Token ***")51 balanceFarmTokenAfterAccounts0 = await farmToken.balanceOf(accounts[0])52 balanceFarmTokenAfterFarmToken = await farmToken.balanceOf(farmToken.address)53 console.log(54 "Balance FarmToken After accounts[0] " +55 web3.utils.fromWei(balanceFarmTokenAfterAccounts0.toString())56 )57 console.log(58 "Balance FarmToken After TokenFarm " +59 web3.utils.fromWei(balanceFarmTokenAfterFarmToken.toString())60 )6162 // End function63 callback()64}Mostra tutto
Per eseguire questo script: truffle exec .\scripts\withdrawMyTokenFromTokenFarm.js. Come possiamo vedere sull'output seguente, abbiamo correttamente riottenuto i MyToken e abbiamo bruciato i FarmToken:
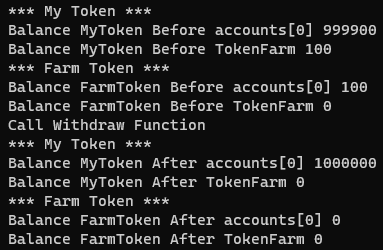
output di withdrawMyTokenFromTokenFarm.js
Riferimenti
Contratti - Documentazione di OpenZeppelin(opens in a new tab)
Sweet Tool per smart contract | Suite di Truffle(opens in a new tab)
Ganache | Suite di Truffle(opens in a new tab)
Cos'è la DeFi? Una Guida per Principianti (Aggiornata al 2021) (99bitcoins.com)(opens in a new tab)
DeFi - La Classifica di Finanza Decentralizzata, su DeFi Llama(opens in a new tab)
Ultima modifica: @Herbie_23(opens in a new tab), Invalid DateTime